World-renowned and prize-winning nano-scientist Michelle Dickinson says Halloween is the perfect opportunity to give Mum and Dad a fright with some super spooky science experiments…
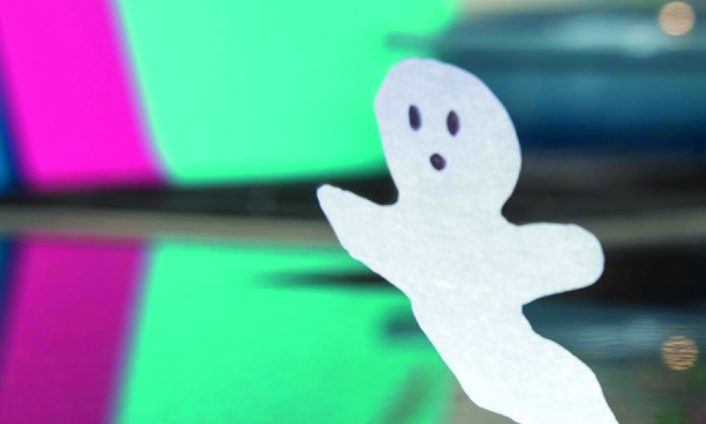
The Dancing Ghost
Scientific Principle: Electrostatics
Time: 20 minutes
Watch in amazement as your tissue ghost magically dances, without you touching it, thanks to an invisible electrostatic force.
Equipment
- 2-ply or 4-ply tissue
- Balloon
- Scissors
- Pen
- Clear tape / sticky tape
Instructions
- Peel apart each of the tissue layers so you end up with a very thin, single ply sheet.
- Using the pen, draw a ‘ghost’ shape approximately 4cm (1.5 in) tall.
- Cut out the shape using scissors and add any features you want to with a pen.
- Tape the base of the tissue ghost to a table.
- Blow up and tie off the balloon.
- Rub the balloon across your hair for around 10 seconds.
- Bring the balloon close to the ghost and watch the ghost rise up towards the balloon, appearing to fly on its own. Boo!
The Science Behind the Static Powered Dancing Ghost
When some objects are rubbed together, they can create a build-up of electrical charge known as static electricity. Rubbing a balloon across your hair causes the negatively charged electrons to transfer from your hair onto the balloon. This results in a negatively charged surface on the balloon. The tissue sheet is neutral in charge, which means that it has equal amounts of both positive and negative charges. However, because opposites attract, when the negatively charged balloon comes close to the tissue, the positive charges within the tissue become attracted to the negative charges in the balloon and rearrange to move towards the balloon. The force of attraction is enough to pull the lightweight tissue sheet up towards the balloon and the ghost shape is picked up by the static charge.
Explore Further
- Does rubbing the balloon back and forth change the amount of static charge compared to only rubbing in one direction?
- If you rub the balloon against your hair for a longer amount of time, does it produce more static charge?
- Try rubbing with materials other than your hair such as wool or silk fabric. Do they create more or less static charge?
Creepy Rubber Bone
Scientific Principle:Chemical Reactions
Time: 20 minutes (plus 7 days)
Tie a bone in a knot with this fun experiment and learn why calcium is so important for strong bones.

Equipment
- Glass jar with lid
- Chicken leg bone
- Vinegar
Instructions
- Rinse the bone in running water, scraping off any residual meat.
- Try to bend the bone by holding at both ends and note how difficult it is.
- Place the bone in the jar, cover with vinegar, and seal the jar.
- Leave in the jar for 7 days.
- Remove the bone and rinse in water.
- Try to bend the bone again, and see how much easier it is than before.
The Science Behind the Rubber Bone
Bones are made up of a mixture of hard minerals and tough, flexible proteins like collagen. It is this combination which makes bones not only strong, but also able to flex without shattering. Calcium is a mineral which helps to give bone its strength. This is why babies
need a lot of calcium-rich milk to strengthen their bones as they grow. Vinegar is an acidic liquid which is strong enough to dissolve the calcium out of the bone and make it less stiff. With more collagen than calcium, the bone goes from feeling hard and stiff to soft and rubbery. The relationship between structure and properties is very important to engineers and is essential in the design of structures that are both strong and lightweight, just like bone.
Explore Further
- Does the experiment work with other acids, such as lemon juice or fizzy soft drink?
- Do you think the size of the bone affects the time taken for the calcium to dissolve?
- Would immersing the bone in a calcium rich fluid, such as milk make it stronger?
Edible Earthworms
Scientific Principle:Crosslinking
Time:45 minutes plus 4 hours setting time
 Using the power of crosslinking, these realistic looking worms not only look amazingly disgusting –they also taste great!
Equipment & Ingredients
- 50 bendy straws
- Elastic / rubber band (or length of string for tying)
- Jug
- Tall container
- Plate
- 2 boxes jelly/jello strawberry or raspberry crystals or blocks
- 10g (1 Tbsp) powdered gelatin
- 125ml (1/2 cup) cream
- 375ml (1 1/2 cups) boiling water
- Green food colouring
Instructions
- Carefully pour the boiling water into a large jug and add the jelly/jello and the gelatin, stirring until dissolved.
- Add the cream and whisk until fully mixed.
- Stir in 3 drops of green food colouring.
- Stretch the flexible part of the straws out so that they are fully extended.
- Gather the straws together and use a rubber band or string to hold them together.
- Place the straws upright in a tall, tight fitting container or jar.
- Carefully pour the mixture over the top of the straws, filling each straw. Refrigerate for 4 hours.
- If the straws start to float, place a weight on top to hold them down.
- Once set, rinse the outside of the straws in lukewarm water to loosen the worms.
- Starting at the top, gently squeeze each straw together with your fingers (or the back of a blunt knife) and slide down the length of the straw to push the worms out onto a plate.
- To make the worms look as though they are in soil, crush dark chocolate cookies and lay them on the plate as a base for the worms to sit on.
The Science Behind Edible Worms
Jelly/jello wobbles because it contains gelatin, a coiled-up protein chain that unravels and floats around as strands when hot water is added. As the water cools down, the gelatin strands coil back up and become tangled with each other, trapping the fluid they are in and
transforming the liquid into a solid structure. This process of gelatin strands becoming tangled with each other is called crosslinking. Because the worms have a high aspect ratio –meaning they are long and thin–they need to be stiffened to help them keep their shape. Adding the extra gelatin causes more crosslinking to occur with the chains making the structure firmer and stiffer when set. Jelly/jello is usually transparent but the additional protein and fat molecules from the cream deflect and scatter the light so that the worms become opaque. Mixing red jelly/jello and green food colouring makes the worms a ‘realistic’ brown colour, but you can make them any colour you like.
Explore further
- What happens if you change the amount of gelatin in the worm mixture? Why do you think this is?
- Do the worms look different if you do not add cream to the mixture?
- What happens if you do not rinse the straws in warm water before squeezing out the worms?
Dr. Michelle Dickinson (MNZM)is on a mission to get kids excited about science. Her new title, The Kitchen Science Cookbook, contains lovingly crafted recipes with a unique twist – each one is science experiment using everyday ingredients –ensuring hours of screen-free entertainment and teaching important scientific principles. Available now from Amazon RRP £19.99 HB. Find out more at uk.kitchensciencecookbook.com